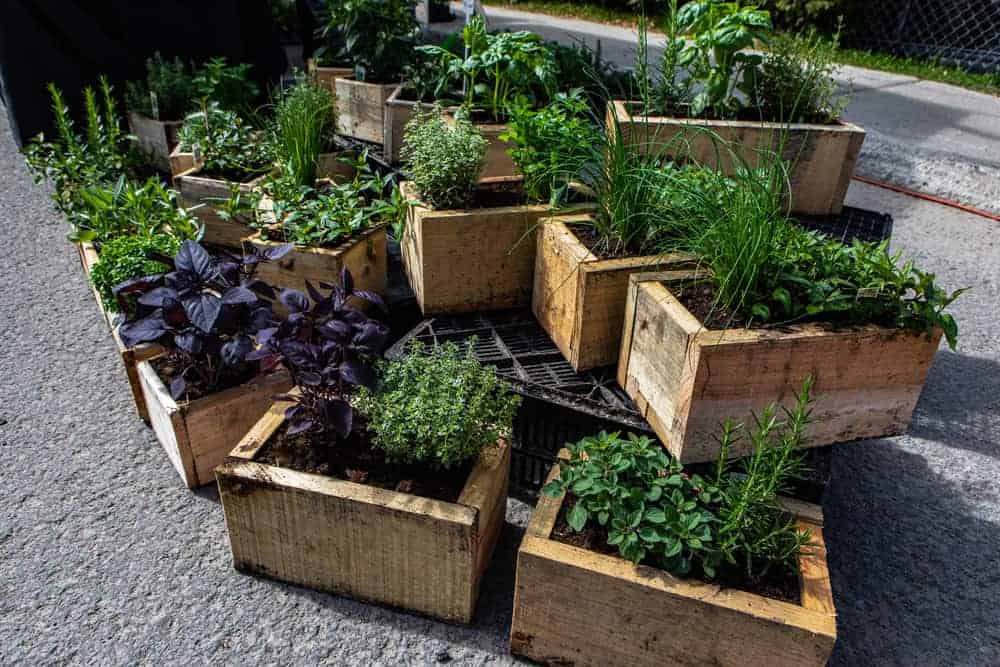
Why Custom Planter Boxes are Perfect for Your Outdoor Spaces
Have you ever thought that your outdoor space is too small to grow your own plants? You should not worry or fear, as custom planter boxes serve as the perfect solution to your problem. Custom planter boxes in custom sizes offer the space and ease you need for accessible and productive growing of your favorite plants and flowers.
What is a Planter Box Installation?
A planter box is a gardening item, with an example being a cedar planter box. It sits on four or more legs, raising your plants and flowers off the ground. It also has a solid bottom, allowing you to properly place your plants without the fear of seeing them fall. It allows you to grow an abundance of food and flowers with much more soil volume for healthier, faster-growing plants. Check the guide about custom planter boxes below.
Guide: How to Build Custom Planter Boxes
Decide how large (or small) you want your custom planter boxes to be. We recommend wood planter boxes. Your decision should be based on how many plants you want to have in each planter, as well as the size of the area where you will be putting your planter. For this article, we will build a smaller box that is about 4 feet by 2 feet (121.9 by 60.9cm).
Purchase and cut your wood
Important: Untreated wood or cedar will work well for this project as they are both easy to work with and can hold up against the natural elements your planter will be exposed to. For a small 4×2 ft (121.9×60.9 cm) planter, you can buy a 12-foot (365.76-cm) board, which you will cut down to form the sides of the planter.
The width of custom planter boxes should be at least 10 inches (24 cm). You will also need a piece that will act as the bottom or floor of the planter if your planter is going to be used on a deck or similar surface. If the box is over soil, you can place a layer of flattened cardboard boxes on the bottom to act as a weed barrier.
1. Use a measuring tape to measure out each side. Mark the places where you will make your cut with a pen or pencil. Use an electric saw or standard hand saw to cut the pieces to size (two 2 foot boards and two 4 foot boards), taking care to make the cuts as straight as possible
Attach the boards
2. Create pilot holes in two of the boards. Pilot holes are holes drilled into the wood to ensure that the wood won’t splinter when you insert the screws into it. You only need to do this on the two end boards (the shorter boards).
You should make three pilot holes, 3/4 inch (1.91 cm) from the end edge of the board. The middle hole should be centered in the middle of the width of the board.
3. Fasten the boards using galvanized screws. Galvanized screws are better for outdoor succulent planters because the galvanized metal can stand up to the elements and will not rust. Line the boards up so that the boards with the pilot holes are positioned on the outside corners. Use a drill and drill bit to make sure that each screw goes through each hole and into the adjoining board.
4. Measure the inside length and width to determine the size of the bottom of the box. With these measurements, cut your bottom board using a saw. Place the board inside the box. Use a drill and galvanized screws to attach the bottom board through the sides of the box.
5. Drill drainage holes in the bottom of the box. Turn your now fully-formed box over and use your drill to create four or five drainage holes in the bottom of the box. These holes are very important, as most plants will develop diseases if they get ‘soggy feet’, meaning that their roots sit in very wet soil for too long.
Add finishing touches
6. Place a layer of nylon or vinyl screen inside the planter. Doing this will protect the wood of your planter. Cut the screen so that it is the same size as the board you used for the bottom of the planter. Lay it in the bottom of the planter and fix it in place with some small nails.
Make sure that you remember to drill drainage holes in the screen that line up with the drainage holes in the bottom board if your box has a bottom.
7. Sand any rough edges. Doing this will give your box a nice finished look, but it is not absolutely necessary to do. Take a sander or a piece of sandpaper and run it along the edges and corners of the box. Run it along the sides of the boards to vanquish any potential splinters.
8. Paint, prime, or stain the outside of your planter. Pick out some paint that matches your backyard or home improvements, or stain your planter to really bring out the wood’s colors. You can also choose to leave your wood alone, as cedar is a beautiful wood all by itself for your custom planter boxes.
9. Add a thin layer of gravel, then add the compost or potting soil. The gravel will help to drain the planter box. The type of soil or compost you use will depend on the types of plants or flowers you intend to add to your planter box.
10. Add your flowers, plants, or whatever seeds you plan to cultivate to your custom planter boxes. Don’t forget to water!
Custom-built Planter Boxes Will Enhance Your Gardening Experience
One should never feel that his or her gardening space is too small to grow plants.
Custom planter boxes serve as the perfect solution to space-related problems in gardening through the form of wooden window boxes, wooden planter boxes, flower boxes, and others.
Your custom planter boxes will offer the space and ease you need for accessible and productive growing of your favorite plants and flowers.
They allow you to grow abundant food and flowers with much more soil volume for healthier, faster-growing plants.